Showing posts with label Recipes: Snacks. Show all posts

Wednesday, April 14, 2010

Snacking

The other day (week!) I read this post on Preschoolers and Peace. In the post, Kendra says that she always has an answer for the "What can I have for a snack?" question. The answer always is:
  • What is in the Snack Jar
  • Fruit
  • Almonds
  • Cheese Sticks

Her post got me thinking. Isn't it so much easier to have an answer already? I mean, the kids are going to ask!

A while ago, I bought 18 pounds (if I remember the weight correctly) of California Raw Almonds at about $4 per pound. I am totally wishing I bought more! At the time, 18 pounds seemed like a lot to me. But, we use them in power bars, in granola, in several other baking recipes and...

almonds are the answer to the ever-present snack question.


It is so easy to let the children get their own snack. And, cleaning up after almonds is a cinch... well, unless they get to giggling while chewing them and you have the almond drool of a two year old to deal with...

For the past six weeks (or so) my children have been very pleased with a small bowl of almonds every afternoon. Talk about a simple snack time! I've been letting the little girls count out 17, 19, 21 (any such number) into little bowls for the counting practise. When they ask, I let them add in some organic raisins, sesame sticks or some other little something. But usually, they are content with a handful of almonds.

So far, this has been the perfect snack to hold them over until suppertime. Perfect in protein, fat and carbohydrates. Perfect for sustaining energy and nourishing growing bodies.

Almonds are so nutritiously packed -- they are a one of a kind snack for kids and adults alike. Just a handful of almonds contains a healthy dose of protein, fiber, Vitamin E, Calcium, Riboflavin, Niacin, Potassium, Zinc, Folate, Manganese and Magnesium, Copper and Phosphorus. They also contain a wide spectrum of phytochemicals which protect against heart disease and cancer.

If kids are going to snack, it makes sense to make their snack nourishing. As long as I can get almonds at a good price, they are the answer to the snack question in our house.

Off to help Witzy get the almonds ready... today we eat them in the car on the way to Ballet. Did I mention how great of a car snack almonds are?


Photocredit: Maria Li

Wednesday, October 14, 2009

The Great Granola Bar Challenge (recipe at the end)

Recently, Elizabeth at Yes.They're.All.Ours sweetly challenged me to makeover her recipe for Craisin Chocolate Chip Granola Bars. She wondered if they could be made any healthier, but still be as yummy. Two of my favorite things are chocolate and berries, so I immediately knew I was up for the challenge.

My first thought was that I wanted to soak the grains in order to neutralize the enzyme inhibitors and phytic acid, making the grains more digestable and their nutrients more accessible.

My second consideration was what to do with the craisins. While I love their flavor, they always contain added refined sugar. But who wants to eat a cranberry that has not been sweetened? So, I nixed the craisins... and I thought of cherries, my very favorite fruit. And cherries go very well with chocolate... so I couldn't miss with cherries, right?

Well, I ran into a problem at the grocery store. I could only find cherries with added sugar. I know unsweetened cherries are available at Health Food Stores, but I did not have time to make that trip... plus they're pretty expensive.

So I thought I would just have to use apricots, since they are available unsweetened and taste yummy with chocolate and nuts. (In college I used to dip apricots in nutella for a "perfect" snack.) But before I left the grocery store, another idea popped into my mind. What about using a cherry "all-fruit jam"? Would that give the bars a cherry flavor without the added refined sugar? I figured it was worth a try.

On Monday I made my first batch of granola bars. I was hoping to call them Very Cherry Chocolate Granola Bars, but they were not very cherry. Even though I used the whole jar of Polaner All-Fruit Cherry jam, they still only had a hint of cherry flavor. They were good, and my children were pleased to eat them... but I thought there was room for improvement.

So, on Tuesday, I gave it another go. This time I used apricots... and we loved them. Now, if you are able to buy unsweetened, dried cherries, I still think they would be BEST. But, if you can not, the apricots were quite tasty with the chocolate and walnuts.

Here is the recipe... Elizabeth's original ingredients, then the ones I used in bold.

Chocolate Apricot Granola Bars

  • 5 cups rolled oats (no change)
  • 1 1/3 cup whole wheat flour (no change)
  • 1 1/3 cup brown sugar (I used Sucanat, but you could use any natural sweetener that is not crystalized, such as Rapadura or Maple Sugar)
  • 1 tsp baking powder (Make sure you buy non-aluminum baking powder.)
  • 2 tsp cinnamon (I omitted this simply for our personal taste preferences.)
  • 1 cup olive oil (I used melted coconut oil, but EVOO is fine.)
  • 2/3 cup milk (For the soaking, I used 2/3 cup of warm water plus 2 Tbsp plain yogurt; then I omitted this milk.)
  • 2 eggs (farm fresh!)
  • 1 cup grated coconut (It's pretty easy to find unsweetened, grated coconut.)
  • 1 cup chopped walnuts (no change)
  • 1 1/2 cup craisins (Use unsweetened cherries or apricots; unsulphered as well is best.)
  • 1 1/2 cups semi-sweet chocolate chips (You can purchase naturally sweetened chocolate chips... I chopped mine the second time around so that there would be more chocolate bites throughout... or you could start with the minis.)
  • I also added 1/2 tsp of salt the second time around, which really helped punch the flavor.

First, mix the oats and whole wheat flour. In a separate cup, mix 2/3 cup of warm water with 2 Tbsp of plain yogurt. Combine the grains and the liquids. I used my hands because I was better able to get the moisture more evenly distributed than with a spoon. Let the wet grains soak overnight or all day long, covered loosely.

When you are ready to make the bars, break apart the clumps of grains with your hands. Then mix in the rest of the dry ingredients. Make a well in the center of the dry mixture and add the eggs and oil. Stir to combine thoroughly.

Spread on a cookie sheet or a jelly roll pan. Bake at 350 degrees for 30 minutes.

These are delicious and nutritious. But remember to eat everything in moderation, even the good stuff!

Enjoy,

Thursday, September 10, 2009

Healthy Snacking Idea

Over Labor Day weekend, we spent some time with our Raw Foodie Friends. We hiked to a natural Rock Slide and let the children have Great Fun sliding down into the pool at the bottom. Of course, we ate together too. I was assigned to bring a sandwich-like food and a dessert.

In my plans, I was going to take the Chocolate Date Nut Balls from the recipe that Andrea shared with us here. But as I pulled out ingredients on Monday morning, I discovered I was totally out of dates. It is very difficult to make Date Balls without dates.

I love to improvise. Really, I do... and this mishap gave me the perfect opportunity. I decided to work with what I had: dehydrated apples. They turned out really yummy and I received compliments on them too!

The only drawback with improvising is that I don't always remember what I did. So this time around, I decided I needed to duplicate them without waiting so long that I couldn't remember. I made them last night for a Bible Study.

So, here's my recipe for Raw Apple Nut Snacks:
(This recipe makes 30 balls.)

Place the following ingredients in a food processor:

  • A packed 3/4 cup of dehydrated apples. (Mine are without chemical preservatives so they look brown.)
  • 1/2 cup of walnuts
  • 1/2 cup of almonds
  • 1/2 cup of sunflower and/or pumpkin seeds
  • 2 Tbsp. freshly ground flax seed (optional)
  • a pinch of sea salt

Process until it looks like a fine meal.

Pour in maple syrup until the mixture sticks together. For me, it took 2-3 Tbsp of maple syrup.

Roll the mixture into 30 balls.

Cover in unsweetened shredded coconut. Chill until serving.

Voila! Pretty easy, healthy snack!

Friday, May 29, 2009

Peanut Butter Power Pops!

Like my Power Bar recipe, I developed this snack for a very specific reason. My oldest daughter, Rainbow, takes ballet all afternoon on Wednesdays. After a long day of school she didn't always have the energy to take her through the class. She often told me that she had a headache on the way home.

I thought that she needed more than a little carbohydrate snack to sustain her through her class. So, I created Peanut Butter Power Pops. (Think pop them in your mouth, not Popsicles.) They have a combination of protein and carbohydrates that provides continued energy... and they are an easy car snack.

The recipe is actually quite simple to make. Here are the ingredients:

First, mix together the peanut butter and honey. This recipe works best if the sticky mixture is in the bottom of the bowl, rather than adding it on top.


Next, in a separate bowl, mix together the protein, cashews, almonds and raisins.


Mix the sticky and dry ingredients together until they are thoroughly combined. They will almost form a ball, but not quite.


Press the dough together into small, bite size balls and place on wax paper. Refrigerate until firm. Store in an air tight container.
Here Rainbow is moving the Power Pops closer together so she can fit more onto the wax paper. The recipe will make twice what you see here.

Enjoy!

Friday, May 22, 2009

Healthy Summer Treats for Kids

Fun Popsicle

My kids are almost finished with school. How about yours? Inevitably, our kids will want snacks this summer. Fun snacks. Here are a few ideas for Healthy Summer Treats.

First, it is simple to make Homemade Popsicles. What's more refreshing than a Popsicle? While the store-bought Popsicles can have a lengthy list of artificial ingredients, you can make them healthy at home with 100% fruit juice. Popsicle molds can be purchased very cheaply. Simply pour 100% fruit juice in Popsicle molds and freeze for later enjoyment. There is a wider range of 100% fruit juices available than Popsicle flavors. Your kids will love them!

For a Creamier Popsicle, try blending together one part plain yogurt, two parts fruit juice and a bit of honey. You can freeze this just like the one-ingredient variety above. My kids like bits of frozen fruit in them... blueberries, grapes, strawberry bits. Try grape juice with frozen grapes or orange-pineapple juice with bits of strawberries. Kids think snacks are more exciting when they help make them, so as much as possible, let your children make these simple pops.

Another warm weather treat my kids love is Homemade Jello. Since we stick to all natural foods, I had to come up with a better alternative than the sugar, artificial-color and artificial-flavor laden choices at the store. You can make 100% Fruit Juice Jello really easily. In fact, the recipe is on the box of Knox (or Kroger Brand) unflavored gelatin. You simply warm 2 cups of fruit juice, dissolve the packets of gelatin and then add cold fruit juice. My children's favorite is cranberry grape jello.

Last, if you have a powerful blender, you can make healthy Strawberry Ice Cream. Blend together 1 cup of real milk, 1 tsp. of vanilla and 2-4 tablespoons of honey. Then add 2 1/2 cups of frozen strawberries and blend again until thick and creamy. This treat is loaded with Vitamin C. But kids just love it because it is cold and creamy.

Do you have any healthy summer treats? I'd love to hear them!

For more Works For Me tips, visit WeAreThatFamily.

Photocredit: Allposters.com

Tuesday, April 28, 2009

Avocados!!!

Avocados by Jan-peter Westermann
Our family loves avocados. They are full of vitamins and minerals and are a good source of monounsaturated fats. Avocados support brain and nerve health while they contribute to healthy vision as well. They also contain beta-sitosterol, which helps maintain healthy cholesterol levels.

Avocados are a perfect baby food because they do not have to be cooked before mashing. They taste wonderfully creamy and compliment many other foods. We love them diced over fried rice or sliced into a salad. Or, on top of pita pizzas.

But, isn't it the pits to cut open an avocado only to find it black and bruised?!? Here's how I select an avocado so that my chances of finding it perfect are highest.
  • First, I don't buy avocados when they are completely ripe. If I do, they are almost always bruised.
  • I prefer to buy avocados when they are turning black and have little green on their skin, yet they are still firm to the touch. At this stage, they will ripen in only a day or two. And, if no child smashes them while putting them away, they usually are perfectly smooth inside.
  • Cut open an avocado when it is slightly soft to the touch, but not mushy.
  • If green (unripe) avocados are on sale, I set them next to bananas, so they will ripen nicely. They will ripen slower without the bananas and they don't seem to taste as divine. I have also heard that keeping them in a brown paper bag helps with ripening, but I haven't tried this method.
  • I don't buy the larger Florida avocados with the "Lite Avocado" label. They taste watery to me.
  • If your avocados get to the perfect ripening stage before you are planning to use them, you can store them in the refrigerator for two or three days to keep them ready.

While we eat avocados with all sorts of food, they are best known as the main ingredient in guacamole. We love good guacamole! We serve it with chips but it can also be served with vegetables for dipping as well.

AE's Best Guacamole:

  1. In a large bowl, mash two or three perfectly ripe avocados.
  2. Add the juice of half of a lemon. If you're using three big avocados, you might want to use the whole lemon. (I have used lime, and in a pinch, I have used orange. Each give a different flavor.)
  3. Add one minced garlic clove, salt and pepper to taste. We like ours peppery.
  4. Stir together until thoroughly mixed.
  5. Add in one finely chopped tomato or 1/2 a finely chopped red bell pepper.
  6. If possible, add in freshly chopped cilantro.
  7. Store the pits in the guacamole until you are ready to serve it in order to keep it fresh and green.
  8. Enjoy!

For more Works For Me Wednesday Posts, visit www.wearethatfamily.com

Photo Credit: Allposters.com

Thursday, April 2, 2009

Papa's Power Bars

If you are looking for a seriously nutritious snack... the kind of snack that gets you through a tough afternoon with enough energy for the evening too... then this is the right recipe for you.


I developed this recipe as a solution to my husband's need for a high-protein, low-glycemic, energy-enhancing, tasty-snack. It is not a frugal food, although compared to store bought energy bars, it is cheaper and contains more protein per serving. The children and I often eat a more frugal version of this recipe (Peanut Butter Power Pops... recipe coming soon), but we consider it a great treat to eat some of these bars... they are very delicious.


Since we often call my husband Papa, we named the bars "Papa's Power Bars." We wrap them individually so he can take one with him each day. We used to label each with an encouraging scripture as well. (We need to get back into that habit.) Witzy helps me wrap each of these, and she does it with extreme love and devotion. Maybe the love gets sealed in there too!


These bars have about 18 grams of protein and cost about $1.25 per bar. This amount of protein is unmatched, and the cost greatly depends on whether you purchase the ingredients in bulk. Here is the recipe for 16 bars:
This is really simple. Get ready. Mix the first five dry ingredients together. Melt the oil and peanut butter in a saucepan. Add the stevia and vanilla. Stir the wet mixture into the dry mixture. Spread in a 9x13 pan. Refrigerate until set. Slice into 16 bars.


Ideally, you want to store these in a non-plastic container in the fridge. If you are eating them on the go, you'll want to wrap them individually as we do.


Note: These must be stored in the fridge. They get messy when they melt.


Okay, so this recipe sounds really easy... but it took a lot of trial and error to come up with a recipe that would meet my requirements, hold together and taste GOOD. I hope you enjoy it!

Tuesday, March 3, 2009

An Alternative to MSG-Laden Ranch Dip

Howdy Strangers! That's what we southerners say when we are just returning to technology after a rare snow storm that stopped life as we know it. Please excuse my absence. Who would have thought that in four short months of blogging, I would miss so many familiar "faces"?

Do you all remember a while ago when I posted strategies for helping our children get their Five-A-Day of veggies and fruits? So many of you commented that one way your children LOVED veggies was with Ranch Dip. While I know that some kids won't stand for a change, perhaps some of you moms out there will be able to substitute this additive-free recipe. (Thanks for posting it, Shannon!)

When you look at the recipe, you'll see that it starts with "Yogurt Cheese." At the outset, let me calm any fears you may experience when you read those words. Yogurt Cheese is not at all difficult to make. Simply pour whole milk yogurt in a tea-towel-lined colander and let it drain overnight. The whey will drip out and leave a "cream cheese" in the towel. Yogurt Cheese is a nutritious substitute for anything that calls for cream cheese. We love it as the base for a cucumber and cream cheese sandwich spread.

Have no fear! If you don't want to make Yogurt Cheese, you can simply substitute plain yogurt. Doing so will yield a "dressing" rather than a "dip," but the taste will be unaffected. Another option that may not be as healthy but is still healthier than ranch seasoning packets: use the list of spices from this recipe and add them directly to sour cream. This last option may be a good transitional dip for kids who might balk at a sudden change in their beloved ranch dip.

Party Dip by Greg Brown

Please comment to let me know how you like this dip or dressing! Or, if you have a recipe for another healthy veggie dip, please comment with the link... don't all mothers need more strategies for serving veggies to our children?

Photo Credit: AllPosters.com

Thursday, February 26, 2009

Make Pita Chips!

We love Pita Chips! Really, these will disappear FAST in our house. Buying prepared Pita Chips at the store can be costly. Prepared chips can also contain added preservatives, MSG or unhealthy fats. Isn't this is the case with most prepackaged foods? Don't despair! You can make them healthier and cheaper at home. And making Pita Chips happens to be really simple. If you love recipes that your children can do solo, this is one of them!

To make Pita Chips, first cut a bag of pitas into chip-size pieces. We use whole wheat pitas that have no added sugar or preservatives. You could even make your own if you're feeling ambitious. Place the pieces back in the bag.

Drizzle the pieces with 2-3 Tablespoons of EVOO (that's extra virgin olive oil), and sprinkle generously with AE's Seasoning Salt (scroll down this link for the how-to).

Hold the top of the bag closed and shake vigorously until all the chip pieces are coated with EVOO and seasoning salt. All of my children love this part. Here Rainbow is taking her turn.
Bake at 350 degrees until the chips reach your desired crispiness. I guess they are technically supposed to be totally crispy, but we like a few soft spots.

We slice some apples and carrots and make a meal out of pita chips... a really cheap meal considering that I can find the pitas on sale for $1 a bag. (Rule of thumb: buy all you can and keep them in the freezer!) Or, if you're having company, they make a delicious appetizer with hummus.

Friday, February 20, 2009

"Totally Terrific" Granola Cookies, according to Spiderman

These Granola Cookies are a great sweet treat for your little ones. While they do have some natural sugar in them, their sweetness is balanced by protein from nuts, seeds and eggs; and by complex carbohydrates from whole grains. My kids love them because they taste good. I love them because they aren't a waste of a snack... they contain real nourishment.


This ingredient photo wouldn't make the cut for any magazine spread. I included it because you'll see that all my nuts, seeds and dried fruits have been purchased in bulk and divided into ziplocs. If you know that you will frequently use an item, such as almonds or sunflower seeds, it is a big money saver to buy in bulk. In this photo, Witzy is tearing apple rings into bits.

So, here's the recipe:
  • 1 c. softened butter (or 1/2 cup butter and 1/2 cup applesauce)
  • 1 1/2 c. natural sweetener (I used sucanat)
  • 2 eggs, preferably from hens that roam free
  • 1 tsp. vanilla
  • 1 c. whole wheat flour
  • 1/2 tsp. baking soda
  • 1/2 tsp. salt (if your nuts are salted, you may consider omitting this extra salt)
  • 1/2 c. unsweetened dried coconut
  • 2 1/2 c. oats
  • 1 1/2 c. dried fruit bits (we had dates and apples today; you could use cranberries, apricots, raisins, and the list goes on...)
  • 1 1/2 c. nuts and seeds (we used almonds, cashew bits, sunflower seeds and pumpkin seeds today)
Cream the butter/applesauce with the sweetener. Beat in the eggs, one by one. Add in the vanilla. Then add in the flour, baking soda and salt. Up to this point, this is a fairly straightforward cookie recipe, but you'll have a pastier dough. This keeps the cookies from getting too dry when you add in the rest of the ingredients. Stir in the coconut and oats. Then mix in the fruit, nuts and seeds.

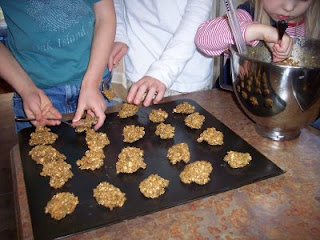
Drop by tablespoons on cookie sheets and bake at 350 degrees for 12 or so minutes. You'll notice all the help I have in this photo. Some say "many hands make light work." Some say "too many cooks spoil the soup." I say "the more the merrier!"


First note: I highly recommend doubling this recipe. Cookies freeze well and this will save you some time when your kids hanker for cookies in the future.

Second note: You could add in chocolate chips. Of course, that adds in some more sugar. But, they do nicely in the recipe... I know because we've tried it that way too!

Coming soon: How to Choose a B Complex Supplement and Natural Sweeteners 101... so stay tuned!

Friday, February 6, 2009

A Morning in Ethiopia -- Dabo Kolo

We do things a little different on Fridays. Monday through Thursday we pretty much stick to our rigorous academic schedule (smile), but on Fridays we take the day for more adventuresome educational explorations. We do science projects, art projects, cooking projects. We read magazines and tons of library books. We listen to Bach and Chopin, very loudly. We watch Moody Science Videos and all sorts of other YouTube performances. And, we do Geography, which is always an adventure.

One Friday, we learned about children in Ethiopia from the Kids of Courage magazine. That was a day never to be forgotten by my littles, for we found their very favorite recipe. Dabo Kolo is a thrill for children to make AND it is healthy! Making Dabo Kolo has become a much anticipated event in our home. I hope your family enjoys it as much as we do!

The ingredients are really simple to put together. First, choose a recipe reader.


Stir together:
2 c. of whole wheat flour
1/2 tsp. salt
1 Tbsp. sucanat
and a nice pinch of cayenne (the original recipe called for 1/2 tsp. but that was WAY too much for my kiddoes)

Add: 1/4 c. EVOO (that's extra virgin olive oil)
1/2 c. water

Knead this until it forms a smooth ball. We use our mixer so this is super-simple.

Then, as if measuring out things isn't fun enough, comes the thrilling part. Roll the dough into long snakes. With a platic knife (or with fingers), cut (or break) the dough into 1/2 inch long, bite sized pieces. Oh, the kids have a great time with this!


Cook in an ungreased skillet over medium-high heat until light brown on all sides. This is the parent part in our house. After I put a layer of the pieces in the skillet, I let them brown on the bottom. Then I flip and stir them around until they are browned on all sides. I remove them to a plate and start with another layer.


I always recommend multiplying recipes... you know, some for now, some for later. But, with this recipe, you may want to start with just one batch until you get the hang of stirring them in the skillet. Caveat: when you do make two batches, it doesn't mean you'll have some left over. They disappear FAST. Here, the littles are just waiting for the Dabo Kolo to cool: